

Post by Shieldwolf on Jun 5, 2010 10:06:14 GMT
Here we post all techniques in generating a realistic map.
You can either (1) make a map from scratch or (2) use the Elevation Data from either of the 2 links in EEH: ee.heavengames.com/new/eeh/mapdesign/elevation.shtml
A. Steps in making Historical/ Earth-located Map using the Links.
1. Get the coordinates of the city or the area of battle where your scenario takes place. Input them on the Elevation Data as instructed in the link. I am making a scenario about the last stand of the Fil-American force during the start of the Pacific Campaign during World War 2 in 1942. In this example, we will use the first link.
Now, let's get the map of Bataan, Philippines. Wikipedia is a good source of coordinates, however what we need is not degrees and minutes, but coordinates in decimal, so be sure to click on the coordinates themselves: get the WGS84, which is 14.67 North and 120.42 East. This means that the northernmost part of the map (top) is 14.67, while the easternmost (right side) is 120.42. Now, you are left with no South and no West. Either subtract decimals (that is, southern and western coordinates are less than the north), or try locating a place adjacent to the area (in this example, Corregidor).
We input 14.67 North, 120.42 East, 120West and 14.2 South. Generate as instructed in EEH link. Save as .dat file.
2. Create your map in the scen editor. If you want your map to be created with certain ambients, for example, those of Forests, use generate map - ambients forest instead of the default grass. Experiment with the map size, which will depend on the needs of your scenario. However, caution: a map that is too large will have lag. I usually use the following numbers: water depth: 1, water cutoff: 5, land height: 8, land cutoff: 1,000.
3. Search for different kinds of maps for your scenario. This might include topographical map and battle situations (again, Wikipedia is very helpful in this, or else Google or Bing Images.)
4. You could also use the Raster Method of Soty here: www.freewebs.com/empirecreationsteam/articles__raster_method.htm
B. Map Making Tricks
1. Hills tool will SCREW cliffs!
Avoid the use of the Hills tools, if you want your elevation-generated map to stay as it is. However, if you have bodies of water inland (like rivers and lakes), I'm afraid you need to use discretion and care so as not to destroy your mountains and cliffs.
2. Realistic Forests
Use the tiny button, Forest. Mix in different types of trees. (Of course, winter trees should only be there in winter maps, while palms are tropical and pines are not found in the desert.) Now, change your terrain type to either grass-sparse or dry-leaves, and then paint the area wherein the trees are located. Mix in some grass-patches or grass-tufts for added realism.
3. Realistic Rivers - Fast!
First, have your hills tool at small, elevation -2. Paint in your river. Then, have your terrain tool at beaches. Paint the area of your river. You can see that it will automatically generate ambients-beaches. Now, switch your terrain to sand-medium, and then paint again the river. You could see that the river has ambients, while having a sandy feel!
4. Swamps and Marshes - Fast!
First, paint the area using marshes. Paint the area using ambients-marshes. Then, pock-mark the area with little circles using elevation -2. Color the area using beaches. Like in number 3 above, you can see that it will again automatically generate ambients-beach. After this, repaint the marsh area using marshes again.
5. Cities/ Towns
If a city is representational, then, it is better to mix in different types of houses in the city block instead of just having, say, house-atomic. You could use pavement, but don't forget to click in some trees and mix in some sand-cracked or sand-medium or grass-sparse under the buildings and trees.
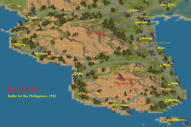
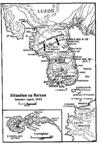
Hmm... For the meantime, I'll end this discussion here. See my Bataan map, as well as one of the maps I based it upon:
You can either (1) make a map from scratch or (2) use the Elevation Data from either of the 2 links in EEH: ee.heavengames.com/new/eeh/mapdesign/elevation.shtml
A. Steps in making Historical/ Earth-located Map using the Links.
1. Get the coordinates of the city or the area of battle where your scenario takes place. Input them on the Elevation Data as instructed in the link. I am making a scenario about the last stand of the Fil-American force during the start of the Pacific Campaign during World War 2 in 1942. In this example, we will use the first link.
Now, let's get the map of Bataan, Philippines. Wikipedia is a good source of coordinates, however what we need is not degrees and minutes, but coordinates in decimal, so be sure to click on the coordinates themselves: get the WGS84, which is 14.67 North and 120.42 East. This means that the northernmost part of the map (top) is 14.67, while the easternmost (right side) is 120.42. Now, you are left with no South and no West. Either subtract decimals (that is, southern and western coordinates are less than the north), or try locating a place adjacent to the area (in this example, Corregidor).
We input 14.67 North, 120.42 East, 120West and 14.2 South. Generate as instructed in EEH link. Save as .dat file.
2. Create your map in the scen editor. If you want your map to be created with certain ambients, for example, those of Forests, use generate map - ambients forest instead of the default grass. Experiment with the map size, which will depend on the needs of your scenario. However, caution: a map that is too large will have lag. I usually use the following numbers: water depth: 1, water cutoff: 5, land height: 8, land cutoff: 1,000.
3. Search for different kinds of maps for your scenario. This might include topographical map and battle situations (again, Wikipedia is very helpful in this, or else Google or Bing Images.)
4. You could also use the Raster Method of Soty here: www.freewebs.com/empirecreationsteam/articles__raster_method.htm
B. Map Making Tricks
1. Hills tool will SCREW cliffs!
Avoid the use of the Hills tools, if you want your elevation-generated map to stay as it is. However, if you have bodies of water inland (like rivers and lakes), I'm afraid you need to use discretion and care so as not to destroy your mountains and cliffs.
2. Realistic Forests
Use the tiny button, Forest. Mix in different types of trees. (Of course, winter trees should only be there in winter maps, while palms are tropical and pines are not found in the desert.) Now, change your terrain type to either grass-sparse or dry-leaves, and then paint the area wherein the trees are located. Mix in some grass-patches or grass-tufts for added realism.
3. Realistic Rivers - Fast!
First, have your hills tool at small, elevation -2. Paint in your river. Then, have your terrain tool at beaches. Paint the area of your river. You can see that it will automatically generate ambients-beaches. Now, switch your terrain to sand-medium, and then paint again the river. You could see that the river has ambients, while having a sandy feel!

4. Swamps and Marshes - Fast!
First, paint the area using marshes. Paint the area using ambients-marshes. Then, pock-mark the area with little circles using elevation -2. Color the area using beaches. Like in number 3 above, you can see that it will again automatically generate ambients-beach. After this, repaint the marsh area using marshes again.
5. Cities/ Towns
If a city is representational, then, it is better to mix in different types of houses in the city block instead of just having, say, house-atomic. You could use pavement, but don't forget to click in some trees and mix in some sand-cracked or sand-medium or grass-sparse under the buildings and trees.
Hmm... For the meantime, I'll end this discussion here. See my Bataan map, as well as one of the maps I based it upon:


